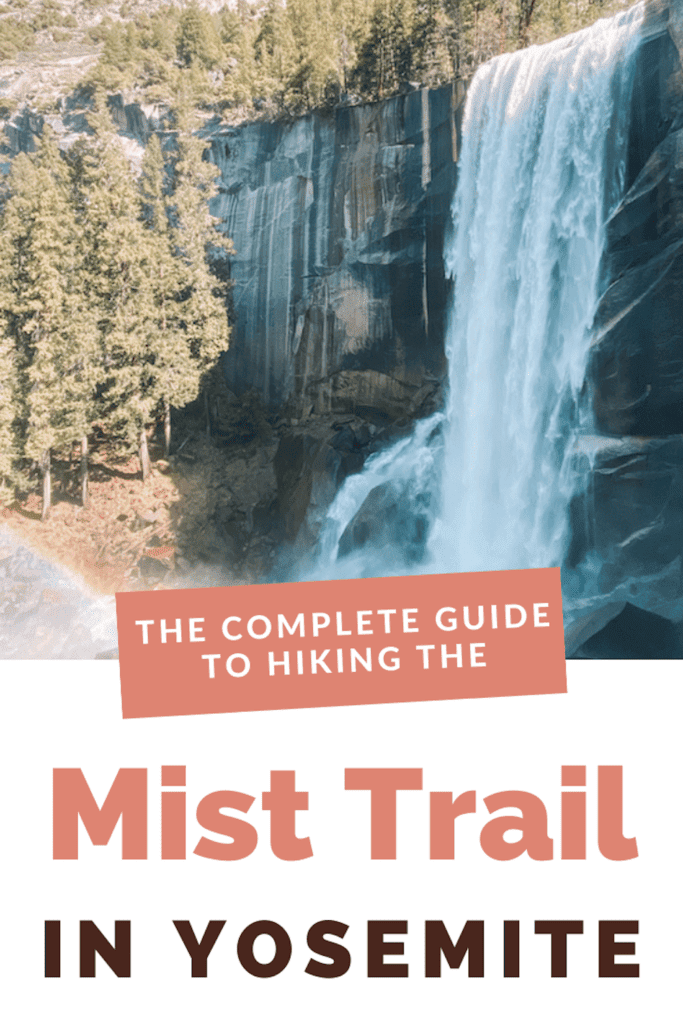
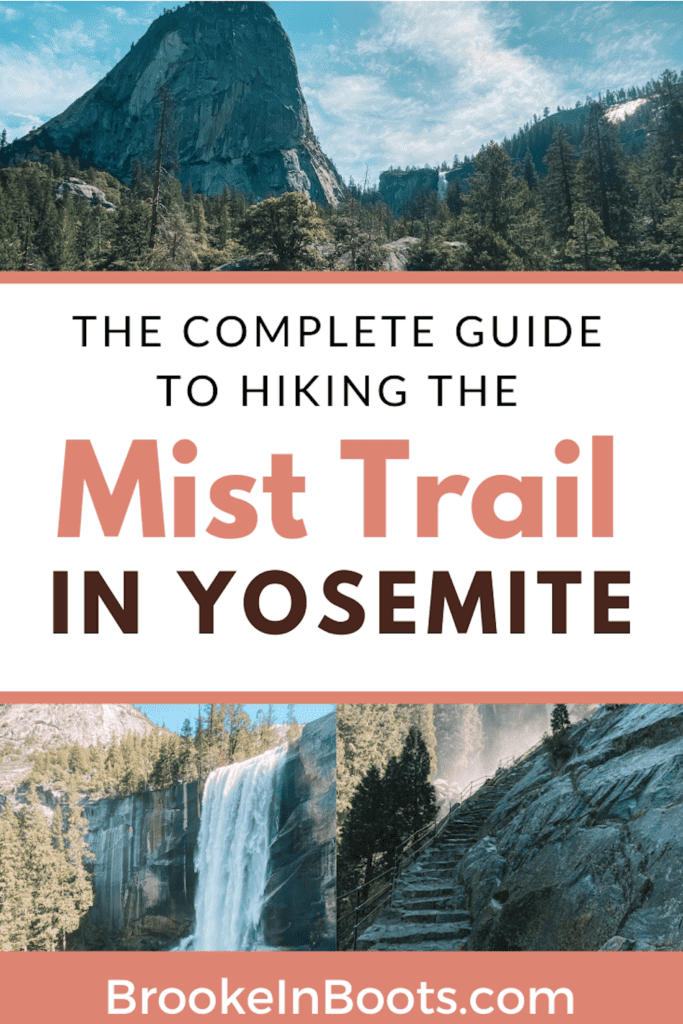
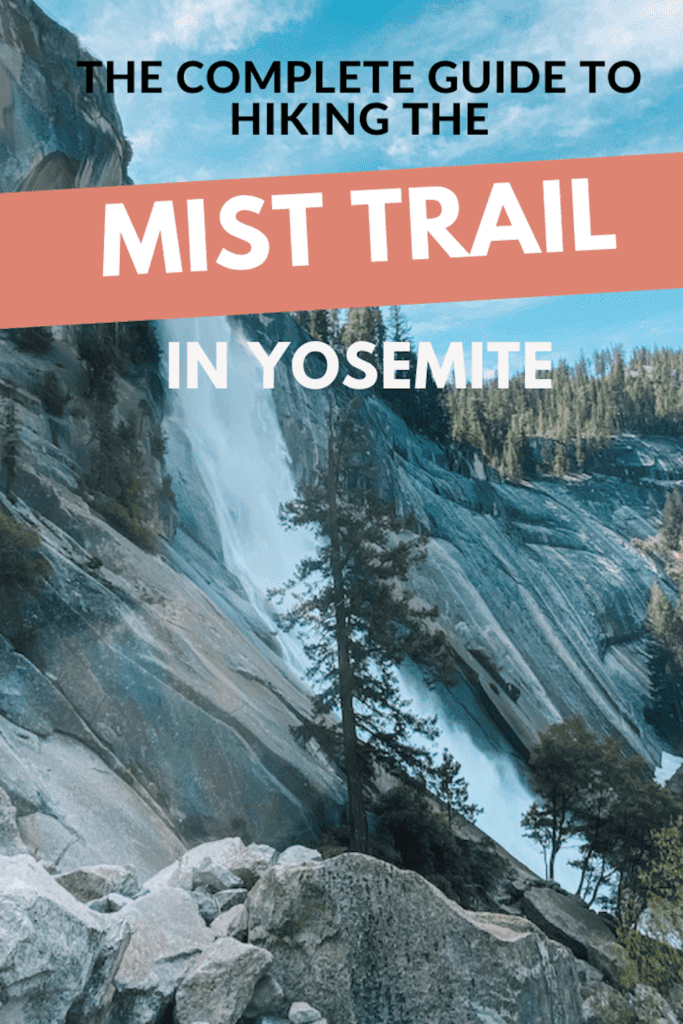
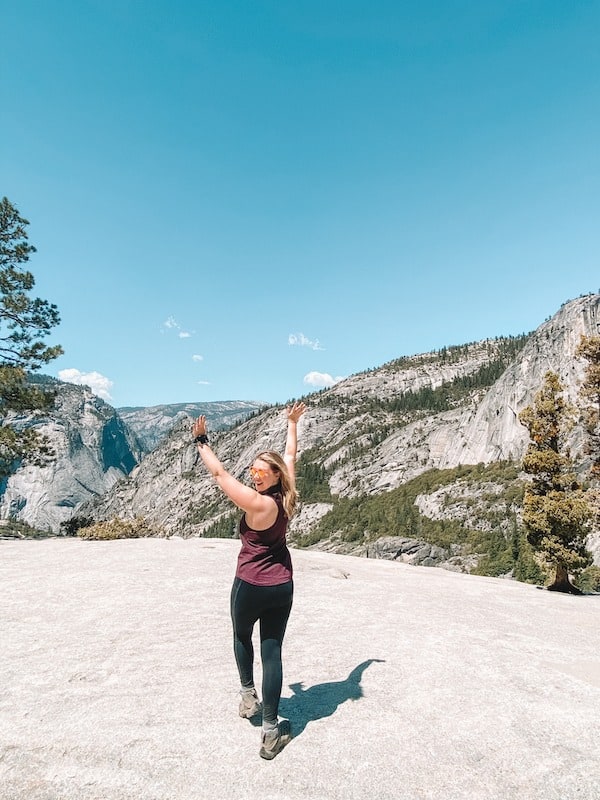
With waterfalls and jaw-dropping vistas around every corner, a trip to Yosemite more than lives up to the hype. With over 750 miles of trails, trying to pick the perfect day hike here is totally overwhelming! But after 20+ visits to Yosemite, I’m here to tell you that if you only have time for one day-hike during your visit, make it the Mist Trail in Yosemite.
I’ll admit, I’m pretty biased when it comes to the Mist Trail. I visited Yosemite frequently as a kid, and the Mist Trail was my very first “big girl hike.” Still, I am blown away by the beauty (and the elevation gain) every time I visit.
Depending on your fitness level, and how much time you have, this trail has an option for everyone. Expect breathtaking views and soaring granite cliffs. Climb more than 600 stone steps carved into the side of two spectacular waterfalls: Vernal and Nevada Falls.
Are you excited yet? Keep reading to learn everything you need know before hitting the trail.
A Quick Look at Hiking the Mist Trail
Depending on your fitness level, and how much time you have, there are several routes along the Mist Trail to Vernal Falls and Nevada Falls. Here’s a quick look at all the routes up this iconic trail:
- Vernal Footbridge: 1.6 Miles round trip / 1 Hour / Moderate / Elevation gain 400’
- Vernal Falls Via Mist Trail: 2.4 Miles round trip / 3 Hours / Hard / Elevation gain 1,000’
- Vernal Falls via Mist Trail and Clark Point via John Muir Trail: 4.2 Miles round trip / 4 Hours / Hard / Elevation gain 1550’
- Nevada Falls Via Mist Trail and Clark Point via John Muir Trail: 6.7 Miles round trip / 6 Hours / Strenuous / Elevation gain 1900′
FYI, the elevation at trailhead 4000 feet. Don’t forget to factor in that you’ll be climbing to nearly 6,000 feet in elevation if going all the way to Clark Point! If you’re coming from sea level, you’ll certainly be feeling it!
How Hard is the Mist Trail in Yosemite?
The Mist Trail in Yosemite is a bucket-list hike, but many people wonder “just how hard is the Mist Trail?” The answer? It depends on your level of hiking experience.
For seasoned hikers, the Mist Trail will be a familiar challenge with long but spectacular miles all the way to Nevada Falls and Clark Point.
However, for those new to hiking or not in top physical condition, the Mist Trail can definitely be considered difficult. With its steep steps and rocky pathways, it requires endurance and proper footwear.
Make a plan before you set out on the trail, and come prepared with plenty of water, sturdy footwear, and all your 10 essentials, especially if you are planning to hike all the way to the top.
Looking for more waterfall hikes in Yosemite? Check out 13 Iconic Yosemite Waterfalls & Waterfall Hikes in Yosemite National Park .
Routes and Maps of the Mist Trail in Yosemite
Depending on how much time you have, your appetite for long hikes, and fitness level, there are 4 different routes for hiking the Mist Trail in Yosemite.
Need a map? Don’t forget to download your map and save it to your phone or GPS device before your hike! Get AllTrails Plus or AllTrails Peak (the most used trail app on my phone!) to download all your trail maps for offline use. Use my promo code brookeinboots30 to get 30% off your annual AllTrails subscription!
The Vernal Footbridge
This is the “easiest” and most family-friendly hike with views of Vernal Falls. The paved (but steep) trail winds from the Happy Isles Nature Center along the Merced River, to a large footbridge, where the massive Vernal Falls can be seen in the distance.
Distance: 1.6 Miles round trip / 1 Hour
Difficulty: Moderate / Elevation gain 400’
Vernal Falls via the Mist Trail
The classic hike. This trail ascends to the top of Vernal Falls via a paved and dirt trail, ending with a few hundred stone stairs carved right into the side of the falls. Warning: You may get WET! The Mist Trails earned its name from the spray that covers the trails in spring and early summer. Bring a rain jacket or a poncho!
Distance: 2.4 Miles round trip / 3 Hours
Difficulty: Hard / Elevation gain 1,000’
eVernal Falls via Mist Trail and Clark Point via John Muir Trail
Ascend via the stone steps of the Mist Trail, then save your knees the strain (and avoid the crowds) by returning via the longer but gentler John Muir Trail. You’ll climb a bit higher than the falls to Clark Point, but you’ll be rewarded with epic views of the falls from above, plus some of Yosemite iconic granite domes.
Distance: 4.2 Miles round trip / 4 Hours
Difficulty: Hard / Elevation gain 1550’
Nevada Falls via Mist Trail & Clark Point via John Muir Trail
If you have the stamina and time for a strenuous all-day hike – this is the best way to see Vernal and Nevada Falls in Yosemite! On this trail you get 2 epic waterfalls and some incredible views of Yosemite’s iconic granite peaks. This is one of my favorite trails not just in Yosemite, but in the entire National Parks system!
Distance: 6.7 Miles round trip / 6 Hours

Difficulty: Strenuous / Elevation gain 1900′
When Is the Best Time to Hike the Mist Trail In Yosemite?
Wondering when is the best time to hike the Mist Trail in Yosemite? Your visit to the Mist Trail may be totally different depending on the season.
Spring on the Mist Trail (aka the BEST time to Visit):
Yosemite’s waterfalls and rivers are fed by snowmelt from the Sierra backcountry. Valley waterfalls are at their fullest and most impressive from late spring, between April and June. In heavy snowpack years, the falls can remain full into July.
Visitor numbers are significantly lower in March and April, making for a much better hiking experience. However, these months come with unpredictable weather, as late spring snowstorms are common in the Sierras. Some roads and trails, like Tioga Road and Glacier Point, are closed until June due to ice and snow.
If you hike during peak spring runoff, be ready to get wet. They call it the “Mist” Trail for a reason, and during heavy snowmelt, that mist can feel like a downpour! Bring a waterproof jacket or poncho if you plan to tackle the stone steps on the “Mist Trail!”
Summer/Fall on the Mist Trail
Nevada and Vernal Falls usually flow year-round, but are smaller during the dry summer and fall months. Due to climate change affecting the Sierra snowpack, extreme droughts are becoming more common, and some summers these once-thundering falls reduce to a trickle.
Visitation to the park is high year-round, but peaks from late spring to early fall. Hotel and campground reservations for busy times fill up months in advance, trails become crowded, and lines to enter stretch for miles.
For a bit more solitude and if you don’t mind the weather, consider visiting in early spring (March-April) or late fall (October-November).
Winter on the Mist Trail:
During winter, parts of the Mist Trail, including the iconic stone steps to Vernal Falls, may close because of ice and hazardous conditions.
Alternative Winter Routes are usually available and posted at trailheads. Check current conditions and route status on the NPS website, here.
If you plan to hike to Vernal and Nevada Falls in winter, be prepared for extreme conditions. If you’re new to winter hiking, refer to my Guide to Winter Hiking and practice your winter skills on easier trails before tackling these snowy routes.
Roads into the Valley often close due to weather, and you must carry chains in your car at all times, even with 4-wheel drive. Many roads and trails, including Tioga Road and Glacier Point, are closed from the first storms in October or November until June due to ice and snow.
Planning a trip to Yosemite National Park? The Yosemite Itinerary Guide has your perfect 1, 2, or 3 day Yosemite trip completely planned for you! With over 20 pages of detailed hiking guides, printable daily itineraries, lodging and dining suggestions and more, you can spend less time planning and more time making epic memories! Check it out, here.
How Do I Get to the Mist Trail?
Make sure to arrive at the trail as early as possible. The Mist Trail is an extremely popular hike, and the trail will be crowded by 8 AM on weekends and good weather days.
Public Transportation is the best way to get to the trailhead once you are inside Yosemite National Park. From your hotel, campground, or Visitor Center Parking, take the Yosemite Shuttle to Shuttle Stop #16 (Happy Isles). Cross the Happy Isles bridge and follow the signs for the Mist Trail.
The most convenient parking is available at the Yosemite Valley Trailhead Parking Lot on Happy Isle Loop Road. This lot is 0.5 miles from the trailhead. Park and follow the signs for Happy Isles.
Parking fills early, so have a backup plan ready ➡️ Check out these Yosemite itinerary guides for more things to do in Yosemite.
If you are only visiting Yosemite for the day, most parking is available at the Yosemite Valley Visitor Center. Park and take the free Yosemite Shuttle to Shuttle Stop #16 (Happy Isles).
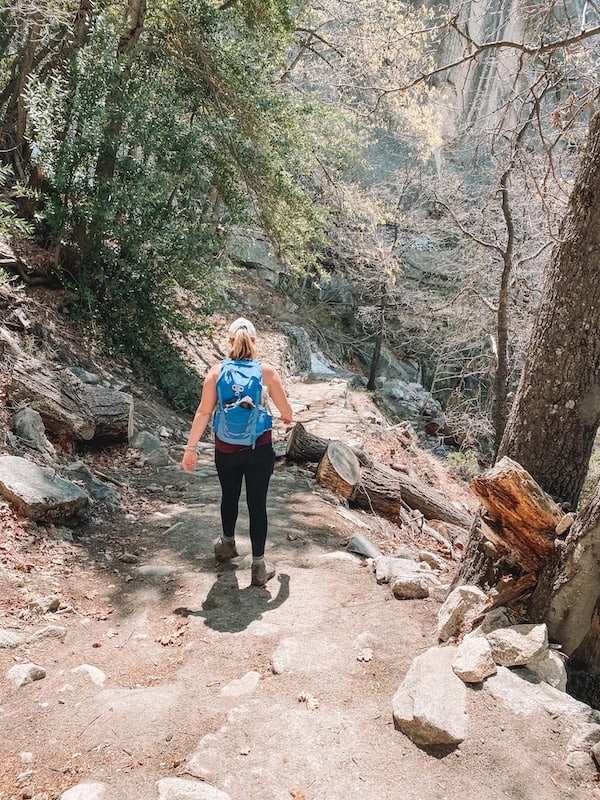
Hiking the Mist Trail in Yosemite: Step by Step Guide
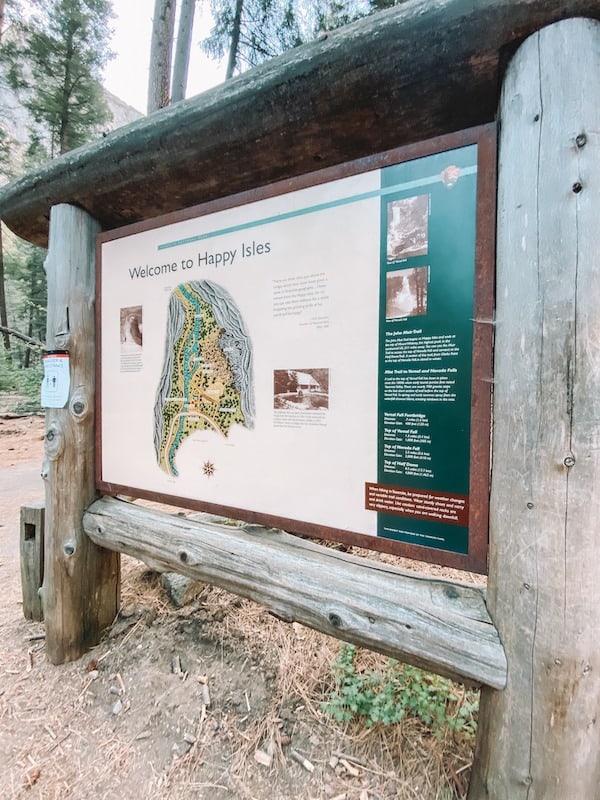
The trail begins at Happy Isles, on the eastern edge of Yosemite Valley. Here, the Merced River flows past several river islands (the Happy Isles) and meanders into the Valley. The Merced is fueled by melting snow high in Yosemite’s backcountry and cascades over two major falls – Vernal Falls and Nevada Falls.
Several major hikes begin at this trailhead, including the Mist Trail, John Muir Trail, Cloud’s Rest and Half Dome. The John Muir Trail (JMT) is a long-distance trail through California’s spectacular Sierra Mountains, beginning at Happy Isles and ending at the summit of Mt. Whitney in Sequoia National Park, 215 miles away.
If you are traveling with kids, or maybe just love a good trailside museum, check out the Happy Isles Nature Center on your way back for kid-friendly interactive exhibits and activities.
The hiking directions below include instructions to make it all the way to Nevada Falls and Clark Point, with options to turn around at the Vernal Falls Footbridge, to just see Vernal Falls via the Mist Trail, Vernal Falls returning via Clark Point and the John Muir Trail, and of course going all the way to Nevada Falls and returning via Clark Point and the JMT.
Happy Isles to Vernal Footbridge
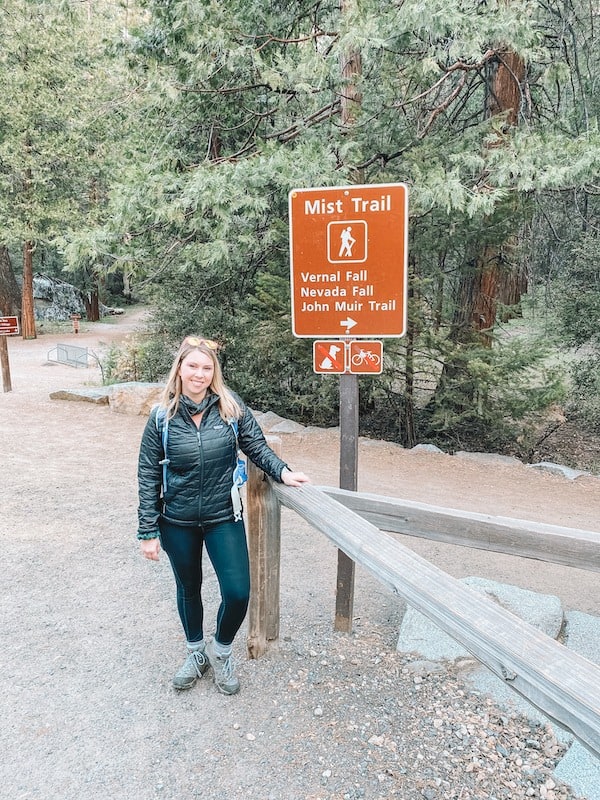
Cross the Happy Isles bridge and follow the signs for the John Muir Trail / Mist Trail on the right side.
The first 0.75 miles are a steady incline over mostly paved trail. Expect big crowds here early in the morning. The first 0.75 miles of the trail follow the winding Merced river as the massive granite cliffs of Yosemite Valley rise above you.
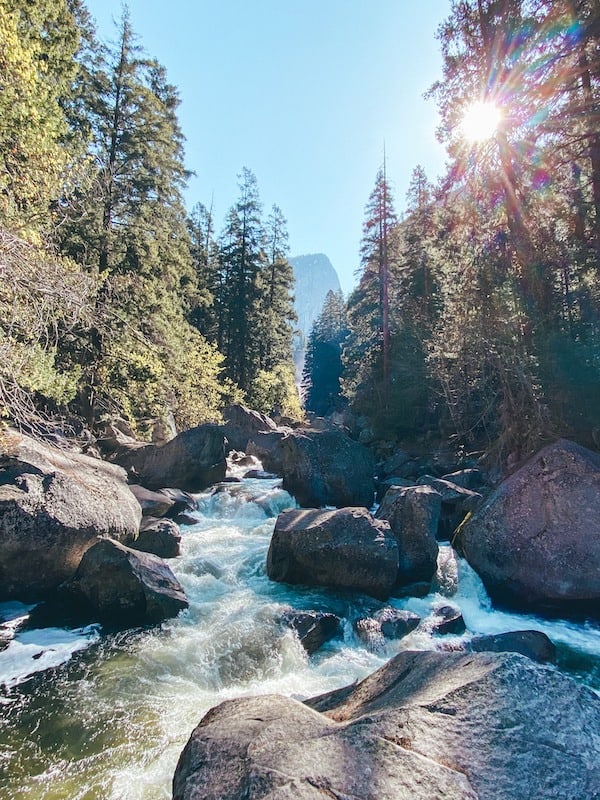
After 0.8 miles and over 400 feet of elevation gain, stop at the Vernal Falls Footbridge for your first glimpse of Vernal Falls! Snap your photos and get ready to climb – you’re going all the way to the top!
After the footbridge, the trail becomes steep and difficult. If you are short on time, or just not interested in a booty-blasting workout, turn around here and return to Happy Isles via the same trail.
Bathrooms and water fountains are located just up the trail from the footbridge.
Vernal Footbridge to Vernal Falls via The Mist Trail
At 0.2 miles past the bridge, the Mist Trail and John Muir Trail diverge. To ascend via the Mist Trail, which I recommend, follow the signs and stay to the left.
From here, the hike becomes steep and strenuous as it climbs 600 granite steps over 0.5 miles. Take plenty of breaks as you climb – plus you’ll want as many photos as possible of this spectacular trail!
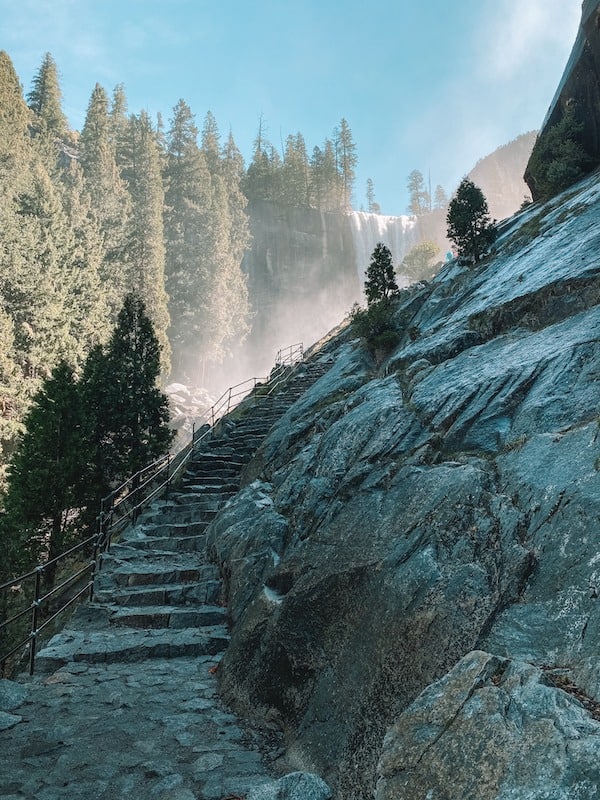
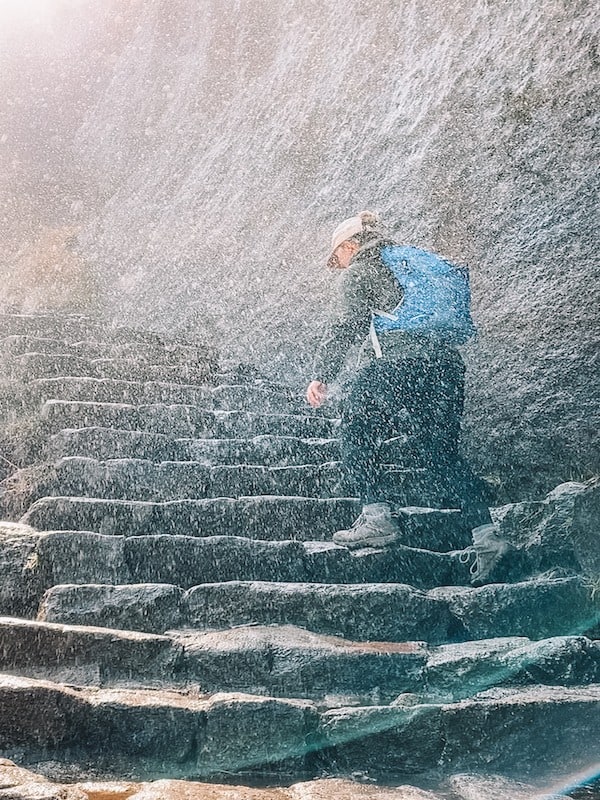
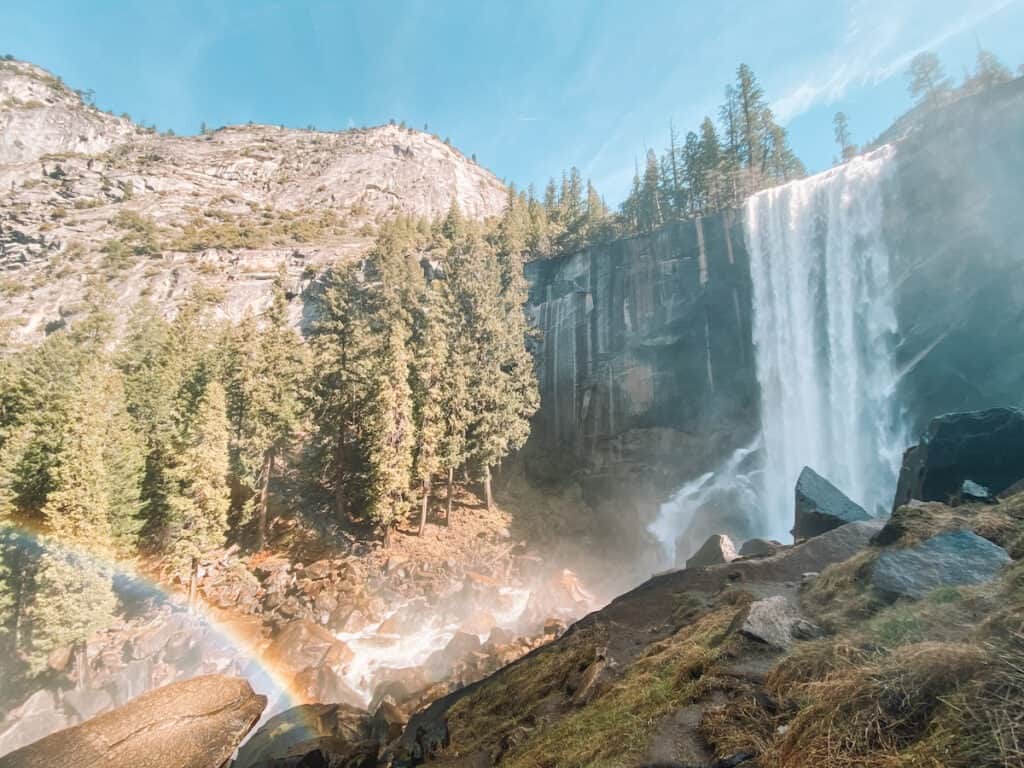
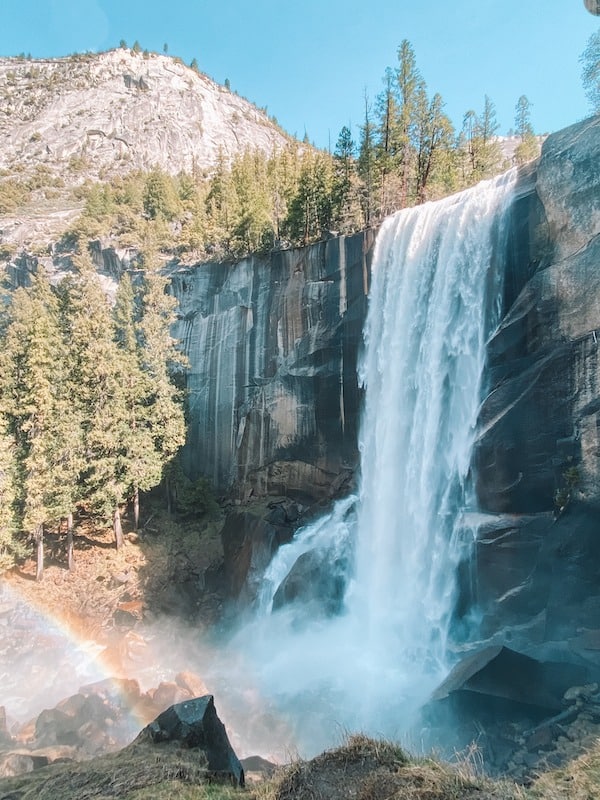
If you hike in spring, the thundering spray of Vernal Falls can make the trail slippery, and get hikers soaking wet! The experience of climbing through the waterfall-rain up the Mist Trail in Yosemite is a not-to-miss bucket list experience.
After one final climb of granite steps carved into the cliff face, you reach the top of Vernal Falls.
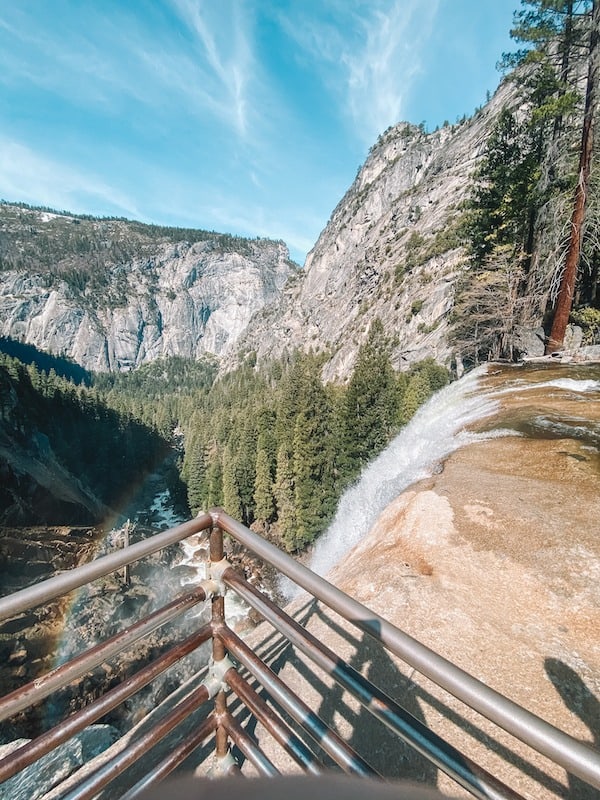
After you catch your breath, head over to the observation point at the very edge of the falls (don’t worry, there is a metal safety railing) and take in that well-earned view! Here, the Merced river rages 317 feet over the sheer granite cliff face.
Take a moment to rest your jelly legs, and enjoy a well-earned snack break on the wide granite slab at the top.
Under NO circumstances should you climb over the railing or swim in the water at the top of either waterfall. Over a dozen people have died on the Mist Trail in Yosemite after ignoring safety warnings up here. Be cautious and remember that no selfie is worth the one-way trip over one of these falls!
Returning to Yosemite Valley
If you are a beginner hiker or unprepared for a strenuous hike, you may consider turning around at Vernal Falls.
If you don’t plan to continue to Nevada Falls, there are two options to return to Yosemite Valley from this point:
Either return the way you came via the Mist Trail, taking extra care on the slippery and crowded stairs. Remember, uphill hikers have the right of way on narrow trails.
Or, for different views and a longer but easier descent, return via Clark Point and the John Muir Trail. Continue towards Nevada Falls on the Mist Trail past Vernal Falls for another 0.2 miles to the trail junction for Clark Point.
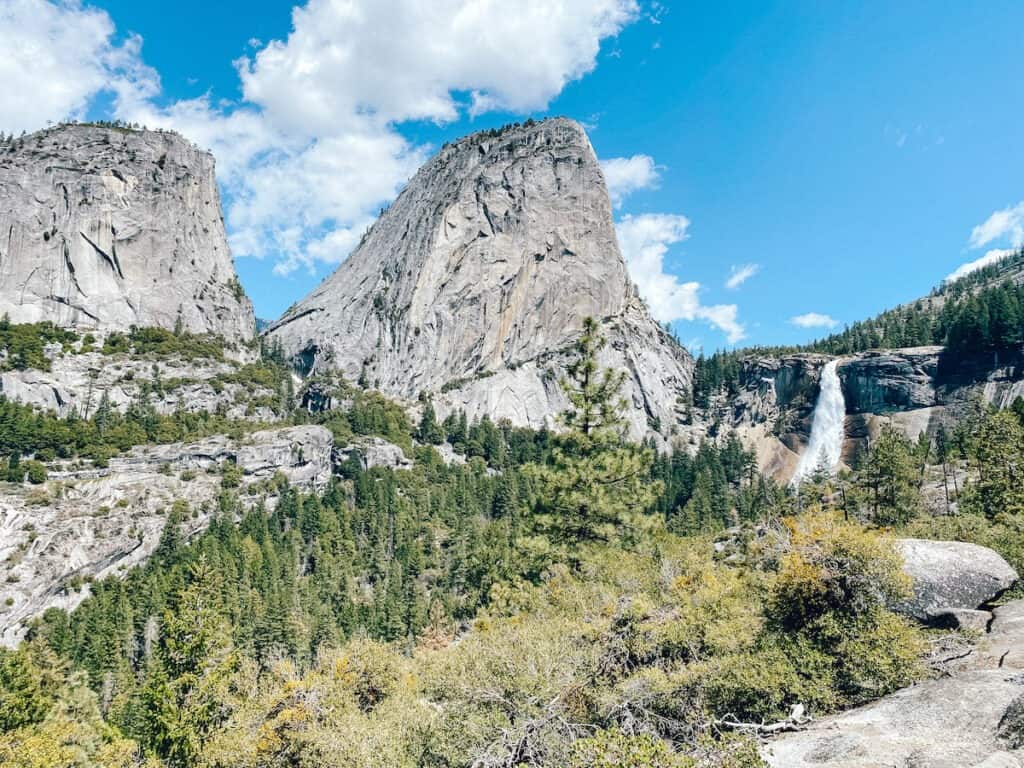
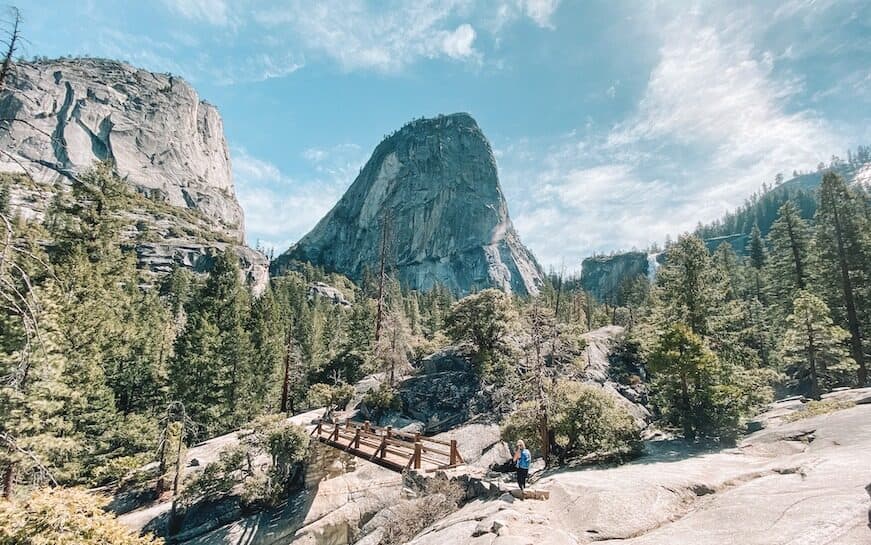
Follow the signs for “Clark Point.” From here, the Clark Point trail ascends another 500 feet over, you guessed it, more granite stairs. After a vigorous climb, you will be rewarded with an outstanding view of Nevada Falls, Liberty Cap and the backside of Half Dome.
Want to learn more about planning an epic National Parks trip? Grab my free Ultimate National Parks Planning Guide, including 70+ pages of National Park packing checklists, planning tips, and everything you need to know to start planning a trip to all 63 National Parks!
Nevada Falls via Mist Trail:
If you plan to continue on to Nevada Falls, be prepared for difficult elevation gain and more stone stairs. The trail to Nevada Falls is more exposed than Vernal Falls. Make sure to bring plenty of water, sturdy shoes, and sun protection. If you are up for the challenge is Nevada Falls worth it? Oh, heck yes.
Continue on the mist trail, following the Merced river upstream as it races towards Vernal Falls. At 0.2 miles, the Clark Point connector trail splits from the main trail.
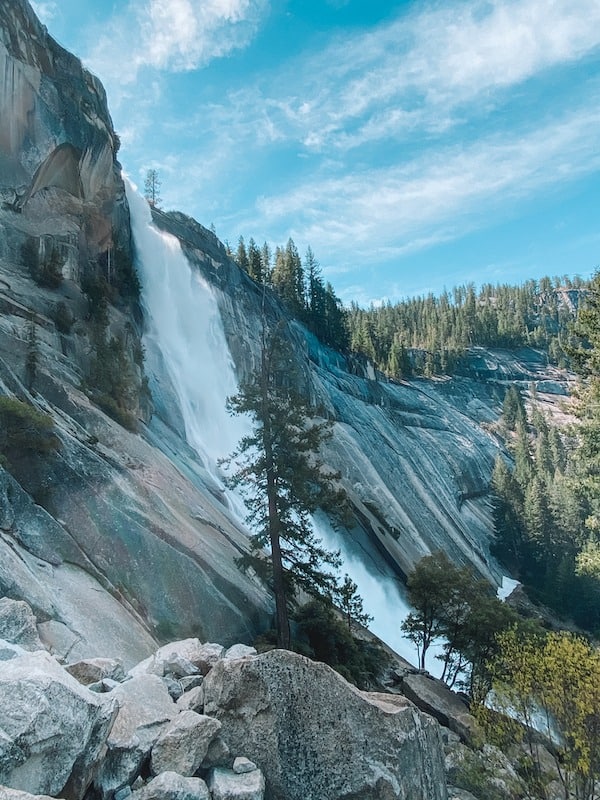
Continue towards Nevada Falls for another 1.5 miles. The trail rises gently through quiet pine forests. The trees eventually open up to a gorgeous view of Nevada Falls and Yosemite Valley behind you.
The trail ascends another series of rocky switchbacks as you climb the 594 foot rock face of Nevada Falls. Once your legs are completely wobbly, the trail splits at a crossroads and the hard part is over!
To the left, the trail to Half Dome, to the right, Nevada Falls.
A compost toilet and water is available at the crossroads. Turn to the right and continue walking over the flat granite plateau.
Take in the granite monolith known as Liberty Cap soaring in front of you. After crossing two wooden footbridges the trail opens up to the breathtaking views of Yosemite Valley and the Merced river roaring over Nevada Falls below you.
Returning to Yosemite Valley
There are two options for returning to the trailhead:
Return the way you came via the Mist Trail. This route is the shortest and most direct way back. It is also steep and crowded on the Vernal Falls portion of the stairs.
If, like me, just the thought of descending hundreds of stone stairs is enough to make your knees ache, consider returning to Yosemite Valley via the John Muir Trail.

To descend via the John Muir Trail, continue on the trail on the far side of Nevada Falls, past the second footbridge. The trail joins with the Clark Point connector trail with sweeping views of Liberty Cap and Nevada Falls from a distance. Continue on the John Muir Trail towards Happy Isles and Yosemite Valley. The JMT joins with the Mist Trail just beyond the Vernal Falls Footbridge that you crossed on the way up.
Take a moment as you return over the Vernal Footbridge to marvel at your summit success! You just climbed the Mist Trail in Yosemite, one of the most iconic hikes in this absolutely beautiful National Park.
Important Tips for Visiting Yosemite National Park
IMPORTANT YOSEMITE UPDATE: Yosemite National Park now requires day-use and peak-hours reservations to enter Yosemite for dates in February & April – October. Learn more about these new changes, here.
Planning a trip to Yosemite? Get in-depth planning tips for visiting Yosemite National Park in my Yosemite 3 Day Itinerary guide, here.
Cell Service is inconsistent in many national parks, including Yosemite. Print your reservation or permits before your trip – or save it as a photo on your cell phone. Download your trail maps for offline use.
Need a map? Don’t forget to download your map and save it to your phone or GPS device before your hike! Get AllTrails Plus or AllTrails Peak (the most used trail app on my phone!) to download all your trail maps for offline use. Use my promo code brookeinboots30 to get 30% off your annual AllTrails subscription!
Be patient when looking for hotel and campground reservations. If you are unable to get a reservation for the dates you have planned, check the website daily (or several times a day). Cancellations for day-use and lodging reservations are common and become immediately available on the website.
Planning a trip to Yosemite National Park? The Yosemite Itinerary Guide has your perfect 1, 2, or 3 day Yosemite trip completely planned for you! With over 20 pages of detailed hiking guides, printable daily itineraries, lodging and dining suggestions and more, you can spend less time planning and more time making epic memories! Check it out, here.
More Yosemite Resources to Plan Your Next Trip
17 Amazing Easy & Short Hikes in Yosemite National Park
13 Iconic Yosemite Waterfalls & Waterfall Hikes in Yosemite National Park
Where to Stay in Yosemite: Best Hotels & Lodging for Every Budget
Yosemite Reservations and Permits 2024: Everything You Need to Know
Best Entrance to Yosemite National Park & Tips for Driving to Yosemite
Hiking the Mist Trail to Vernal and Nevada Falls in Yosemite
What to Pack for Hiking the Mist Trail in Yosemite
Looking for the right hiking gear? These are my favorite pieces of gear that I regularly use (and love) on my day hiking adventures:
- Hiking Shoes: It all starts with your feet! The Merrell Moab is an excellent all-around hiking boot that also comes in a hiking shoe version, as is the budget-friendly Columbia Newton Ridge hiking boot.
- Hiking Socks: Remember, the best hiking shoes are only as good as the socks you wear. Darn Tough socks come in a variety of fun colors and have never let me down! Trust me, these bad boys are worth it to avoid blisters and comfortably break in any boot.
- Hiking Tops: No matter the weather, choose tops that are quick-drying and moisture wicking. Avoid cotton, especially in the winter, as it stays wet and can cause hypothermia. I LOVE my REI Sahara Sunshade hoodie and the Patagonia Capilene Cool tops.
- Hiking Bottoms: For long pants, check out the Prana Halle Joggers or the Fjallraven Abisko Trekking Tights. You more likely to catch me in shorts on the trail. My favorites are these budget-friendly running shorts from Target , the Vuori Clementine Shorts, or the Patagonia Baggies.
- Hiking Backpack: Your backpack should be lightweight with enough support to carry a full day’s worth of supplies without hurting your back and shoulders, like the REI Flash 22 or Osprey Tempest 20 Pack
- Rain Gear: Remember the “mist” in Mist Trail? Even on sunny days you may end up soaking wet thanks to the thundering Vernal Falls. Bring a waterproof rain jacket or reusable poncho to keep yourself dry.
- Water and Snacks: Pack at least 2 Liters if you are headed to the top of Nevada Falls – more in the hot and humid summer. The tops of both Falls are perfect spots for a short picnic. Pack energizing and nutritious snacks, like protein bars, nut butters, and fruit.
- Sun Protection: The hike to Nevada Falls is particularly exposed to the sun, but take care to protect your skin no matter how far you’re going. I recommend at least 50 SPF plus a hat and sunglasses.
Pin This Post For Later