
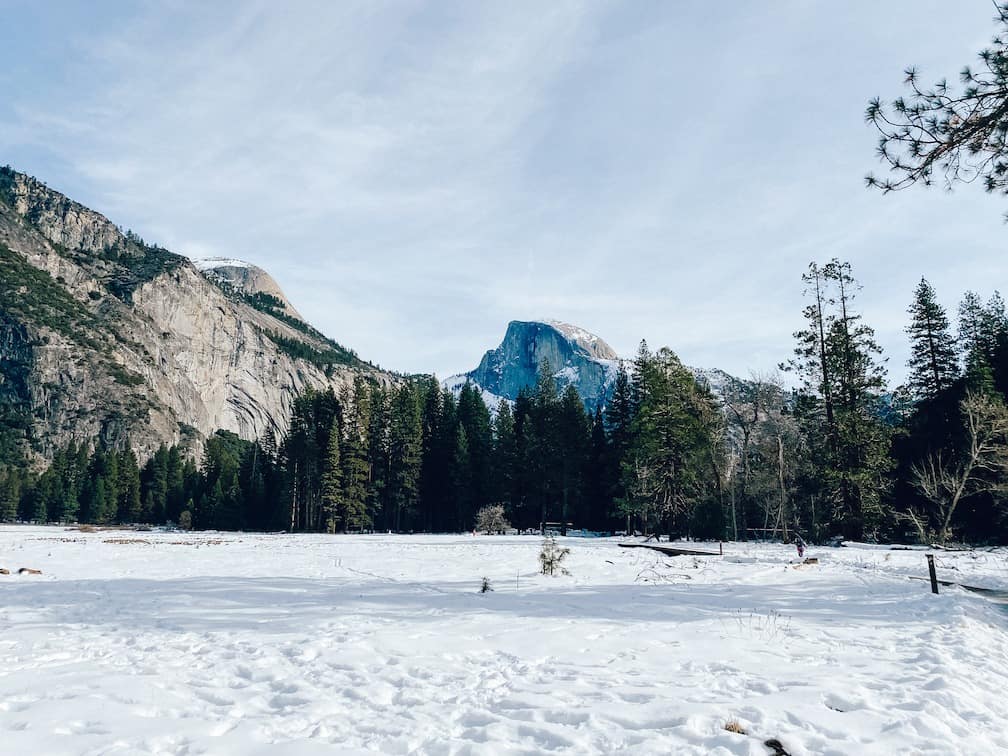
Winter may be cold and snowy, but don’t pack away your hiking boots for the season just yet. Hiking in winter is my favorite way to alleviate those winter blues and explore my favorite hiking trails and National Parks like I’ve never seem them before. Learn how to stay safe and warm with these 17 essential tips and advice for winter hiking for beginners.
Disclosure: This page may contain sponsored content or affiliate links, including Amazon links, where I earn a small commission from any purchase – at no extra cost to you. This commission helps keep Brooke In Boots up and running. As always, all opinions are 100% honest and my own!
Winter Hiking for Beginners: The Basics
1. The Winter Hiking Season is Longer Than You Think
Snow in June? Ice in September? Depending on where you hike, the winter season can start earlier and last longer than you would think. Winter hiking beginners may be surprised to see snow and ice on high elevation trails or shady areas well before Halloween in October and long after Memorial Day in May.
Be prepared for cold weather conditions in the mountains as early as September and as late as June. This is especially true in places like the Sierra Nevadas, the Rockies and northern New England mountains.

2. Prepare for Shorter Daylight Hours
The biggest bummer about cold weather hiking? Less hours of daylight. Depending on where you live in the United States, the sun may fully set before 4 p.m. Start your hikes early enough in the winter to avoid being on the trail in the dark when temperatures drop and navigation becomes more difficult.
To avoid the coldest conditions, plan your hikes for the warmest part of the day, usually in early afternoon.
3. Practice Cold Weather Hiking on Easy Trails
Winter hiking beginners may be surprised with the demands of hiking in icy and snow conditions. Expect to hike slower than your usual hiking pace, and to exert more effort than hiking in dry conditions.
Practice winter hiking on short and easy trails until you become comfortable with your pace and the demands of winter hiking techniques. Once you have mastered the basics and comfortably understand hiking in cold and snow, then you can try more strenuous winter challenges.
4. Check the Weather Conditions
Conditions can change suddenly during winter, especially in the mountains. Remember that summit conditions are often substantially different than at the trailhead.
Don’t assume that a sunny day will stay that way and plan accordingly by bringing the proper gear and warm layers (more on both of those below).

5. Understand Winter Trail Conditions
Not all trails are friendly for beginner hikers in winter. Some trails close for the season, and some become cross country or snowshoe only. Check local websites for restrictions and conditions.
Before any hike, I check crowdsourced information like AllTrails, local hiking Facebook groups, and blogs to get a clear picture of what I can expect on the trail.
Have to Run? Pin This Post for Later!


Safety Tips for Winter Hiking for Beginners
6. Avalanche Danger
Always check avalanche conditions before hiking in the mountains. This is especially true if you live in the western United States or northern New England where avalanches are common.
Avalanche.org provides up to date data from the US Forest Service on avalanche conditions as well as basic education on avalanche safety. If you plan on spending significant time in avalanche country, consider taking an in-person safety course.

7. Winter Hiking Navigation for Beginners
Snow and ice can easily cover trails and trail markers during winter. A trail that is familiar to you during the summer will look dramatically different after a foot of snow. Make sure to take extra care that you are following the right path.
Frequently check for blazes, signs, and cairns on the trail and at trail junctions to make sure you are following the correct route.
8. Stay Hydrated
Drinking plenty of water is just as important during the fall and winter as during your hot summer hikes. Staying hydrated also helps your body regulate temperature. You should carry at least ½ liter of water for every half hour of hiking. More if your hike is strenuous.
Use an insulating hose for your hydration pack to prevent water in the tube from freezing, or wrap your water bottle in insulating layers, like wool socks, to keep it from turning to ice. Also try taking frequent small sips and, after drinking, blow back into the reservoir to keep the tube empty and prevent ice from building up.
9. Bring Along a Hot Drink
One of my favorite tricks for cold weather hiking is to bring a thermos of your favorite hot beverage, like coco, tea, coffee or cider.
Be aware that alcohol lowers the body’s temperature, and caffeinated drinks like coffee can be be dehydrating.
10. Bring Snacks
Be sure to pack plenty of energy snacks for hiking in cold weather. Your body burns calories faster during cold weather as it tries to keep you warm. Make sure to snack frequently on energy-boosting nutrient-rich food, like granola bars, jerkey, dried fruits and nuts, peanut butter or other nut butters.
Be sure to pack out everything that you bring with you, including wrappers, apple cores, orange and banana peels as part of Leave No Trace!

11. Understand the Symptoms and Treatment for Hypothermia
Hypothermia can happy any time of year, but it is especially something to be mindful of when hiking in cold weather. All winter hiking beginners should know how to spot the symptoms of hypothermia, and how to immediately treat it.
Hypothermia occurs when the body’s temperature drops below normal. Hypothermia is a serious condition and should be treated immediately. Signs of hypothermia range from mild shivering, loss of balance, change in mood or sluggish thinking, to dizziness, forgetfulness, intense shivering, disorientation, sleepiness, and irrational behavior.
If you suspect you or one of your hiking companions is exhibiting signs of hypothermia, get indoors as quickly as possible. Swipe out any wet clothing for dry, insulated clothing. Shivering is the body’s way of producing more heat, so make sure they eat and drink plenty of water to give the body enough energy to warm up.

12. Share Your Plans With 2 Trusted Contacts
The number one safety tip I have for all hikers is to always share your hiking plans with at least two trusted contacts who are not with you.
Before leaving for you hike, share detailed trail information, expected return time, and a time by which your contacts should contact authorities if you do not check back in with them.
While this may seem like overkill, giving this kind of information to Search and Rescue as soon as possible can make a huge difference in outcome, should an emergency happen. Try and share this information before you get to the trailhead, as cell-service is not reliable at many trails.

Gear and Clothing for Winter Hiking
You don’t have to spend a fortune to get started winter hiking as a beginner. But there are a few important pieces of gear that are necessary for an enjoyable – and more importantly safe – hike during winter.
Keep an eye out of end-of-season sales and used gear for the best budget-friendly options.
13. Wear Waterproof Hiking Boots
Unlike hiking in summer and fall, winter hiking in ice or snowy conditions should only be done with a good pair of waterproof hiking shoes or boots. Good winter hiking boots for beginners should be waterproof, have good traction, and solid ankle support.
Looking to purchase hiking boots? I highly recommend the Merrell Moab 2 Mid Waterproof boot for winter hiking beginners and advanced hikers alike.

I wore the Merrell Moab for years when I first started my hiking journey. This boot has excellent traction for rocky and slippery terrain and solid ankle support. Most importantly the waterproofing has held up over time and consistently keeps my feet dry and blister-free.

14. Microspikes vs Crampons vs Snowshoes
Raise your hand if you’ve ever fallen on your behind and bruised your butt – or worse – while walking on ice? 🙋♀️🙄
If you’re going to head out during winter, you will most likely encounter ice and snow on the trail. The solution? Traction.
Microspikes, Crampons, and Snowshoes are the three ways to get a sure-footed grip on slippery ground. Each of these accessories are used in different conditions.
If you’re just starting out hiking in cold and icy weather, I strongly recommend buying a pair of steel slip-on spikes to wear over your hiking boots.
I love the Kahtoola MICROspikes and bring them on every winter hike.

Microspikes
Microspikes are metal chains with spikes that slip over your hiking boot and grip into snow and ice. Think of these as tire-chains for your feet. Microspikes are easy to use and easy to carry. Microspikes are perfect for most beginner to intermediate level hiking that does not involve significantly deep snow.

If you’re ready to get started winter hiking, I recommend the Kahtoola MICROspikes. The Kahtoola brand is extremely popular on winter trails because of their durability and 2 year warranty. I found the spikes relatively easy to slip on and off, and lightweight enough (12 oz.) to throw into my daypack when not in use.
Crampons
Crampons are microspikes on steroids. Built with longer spikes and more durable hardware, crampons are ideal for steep and icy mountain ascents, ice climbing, and technical mountaineering.
Snowshoes
Snowshoes are a wide and light frame that is attached to the shoe and used in deep and powdery snow. By increasing the surface area and distribution of the hikers weight, snowshoes prevent you from sinking into deep snow. Snowshoes are a more substantial investment than spikes, and usually run upwards of $150.
If you’re looking to try out snowshoeing without committing to the price tag, many ski resorts and ski rental companies will rent out snowshoes by the day or by the season. Gear retailers like REI and LL Bean offer seasonal snowshoe beginner classes that include instruction and rentals for a low price.
15. Always Carry the 10 Essentials
Always carry your “10 Essentials” whenever you hike in cold weather. What are the 10 Essentials? The term refers to the 10 essential items you should always pack when planning for any hike.
he purpose of the 10 Essentials list is to 1. Prevent and properly respond to emergencies on the trail and 2. Allow you to safely survive a night (or more) outside if necessary.
Learn more about the 10 essentials, including what I pack for every day hike in my Packing for a Day Hike: Essential Guide.
For winter hiking, make extra sure that you have packed your emergency shelter, light source, fire source, and extra clothing.
16. Layers, Layers, Layers
Staying warm and staying dry are the two most important considerations when planning your winter hiking wardrobe. The key to both of these is layers.
Proper layering will keep you warm during the beginning of your hike and during a lunch break, and keep you comfortable and moisture-free while breaking a sweat.

Stay away from cotton when choosing gear. Cotton retains sweat and moisture, making you susceptible to chills, discomfort, and even hypothermia.
Base Layers
A base layer is the layer closest to your skin (other than your underwear). A base layer should insulate and regulate your body temperature by wicking moisture (aka sweat) away from your body to keep you warm and dry.
Wool is the gold standard for winter wear, and hiking wear in general. Wool is naturally water resistant and moisture wicking. It is a lightweight fabric that provides a natural insulation. The only downside is that wool is usually more expensive than other synthetic fabrics.
Synthetic thermal fabrics are usually made of a polyester blend. These fabrics are moisture wicking and antimicrobial. Some brands incorporate thermal reflective fabric that looks like tiny silver dots covering the inside of the garment. Thermal reflective fabrics reflect and retain the warmth produced by your body during the hike and help keep you warm.
When it comes to my base layer bottoms for women you have two options: hiking pants or leggings. I almost always prefer leggings for comfort and easy movement in both the winter and summer. Choose leggings that are moisture wicking and durable enough to withstand scrambles over sharp rocks and sitting on the ground without snags or rips.
On days that are below freezing or extra windy, you might want to add an additional thermal layer underneath your leggings or hiking pants. Again, stay away from cotton and non-moisture wicking fabrics.
For those who are extra cold sensitive, or heading out on sub-freezing days, fleece lined leggings and hiking pants provide additional warmth and insulation.


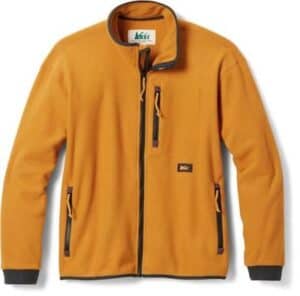
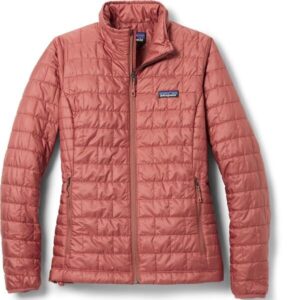
Mid Layers
Your mid layer is, well, midway between your insulating base layer and waterproof top layers. This layer will depend heavily on your own tolerance for cold, how strenuously you will be hiking, and the weather.
You generally want to have both a fleece and insulated jacket available in your pack. Having both available to wear over your base layer means you can add and shed layers as you warm up on the trail.
Waterproof Top Layers
The top layer is all about water and wind-proofing. Your waterproof layer is sometimes referred to as a “shell” layer. You won’t always be wearing your shell, but when you need it, you’ll be very glad you brought it. Wear this layer when it is raining, snowing, or if it is very windy and you need extra warmth.
I always carry a waterproof jacket which doubles as a wind-proof layer against cold winds. Look for a jacket that is waterproof but still allows for ventilation to avoid overheating.
If you expect to encounter rain or snow, carry waterproof pants to wear over your base layer.
When snowshoeing, insulated waterproof pants will keep you dry in deep snow. Gaiters are waterproof sleeves that cover your foot and ankle and attach to ankle, calf or knee depending on the amount of coverage you need. Gaiters can help keep out snow, rain, as well as dirt, dust and rocks from getting into your boots. Waterproofed and insulated gaiters are useful for trekking through deep snow or snowshoeing.


17. “Be Bold, Start Cold”
It may sound counter-intuitive, but all those warm layers I just told you to bring? Don’t wear them all at the beginning of your hike!
A common saying among winter hikers is, “Be Bold, Start Cold.” Why? The goal is to avoid sweat, which causes cold and even dangerous hypothermia.
Hikers often over-layer at the beginning of the hike when their body is not warmed up from movement. As a result, you usually end up having to stop and shed those outer layers of clothing shortly into your hike after you begin to warm up and start sweating.
Clothing that becomes wet from sweat can loose its insulating properties, which makes it unusable to warm you up when you really need it!
So, the next time you hit the trailhead, keep your warmest layers waiting for you in your pack, “be bold, start cold” and wait to put your extra fleece or jacket on until you take a break, or the temperature drops.
There you have it! Winter Hiking for beginners is all about preparation and a willingness to step out of your comfort zone a little bit.
Hiking is an incredible way to stay active and get outdoors, even during the long winter months. With the right planning and proper gear you can feel confident about stepping onto the trail this winter.
Pin for Later


